By default you can set up Stripe, PayPal and other payment gateways to complete a sale using Easy Digital Downloads. But all of them happen on a separate checkout page.
Wouldn’t it be nice if you could use something like Paddle or SendOwl to collect payment in a simple popup modal, and have Easy Digital Downloads handle the software licensing?

Contents
- Why would you want to do this?
- Deciding which platform to use
- Creating the Plugin to Handle Webhooks
- Add software licensing to the plugin
- SendOwl
- Paddle
- Next Steps
Why would you want to do this?
(Hopefully) Increased Conversions
A quick checkout can increase conversions, and can be a good thing to test. Someone is more likely to go through the checkout process if you’re collecting the minimum amount of detail possible. After all, why should someone have to enter their full mailing address when you’re not mailing anything?
Sure, you can do this with Easy Digital Downloads, but it’s still loading a separate checkout page to complete the purchase.
Tax Handling
If the quick checkout service is the one collecting the payment and delivering the file, then they are normally the ones responsible for collecting and remitting the appropriate sales tax (like VAT from EU customers).
If you’re Canadian like I am, normally you need to collect the full address in order to charge the proper sales tax to Canadian customers and have the detail on your customers in case of an audit. By using something like Paddle where they are the ones delivering the file and using their Stripe/PayPal accounts for process, you can avoid having to collect their full address and charging sales tax to Canadians (note: I’m not an accountant and this isn’t legal advice, but from speaking with experts and everything I’ve read this is the case). The disadvantage is they’ll charge a percentage fee of your sales, but it’s not much more than using PayPal and Stripe (5% + 50 cents per sale vs. 2.9% + 30 cents as of September 2017).
Requirements
You’ll need an account with Paddle or SendOwl, or any other service that has a webhook to alert Easy Digital Downloads that a new sale happened.
Be careful about using services with webhooks that don’t provide a way for you to verify that the sale is “real” – otherwise someone could easily generate license keys without actually making a purchase.
You’ll also need the Easy Digital Downloads Software Licensing extension to easily serve updates and generate the license keys.
Deciding Which Platform to Use
Both SendOwl and Paddle give you a similar checkout popup, and support both credit cards (using Stripe) and PayPal.
Paddle
Paddle will use their Stripe and PayPal accounts, so you don’t need to have them setup. They’ll charge a percentage fee for the service on every sale you make, but it’s not much more than what the transactions fees with PayPal and Stripe would be.
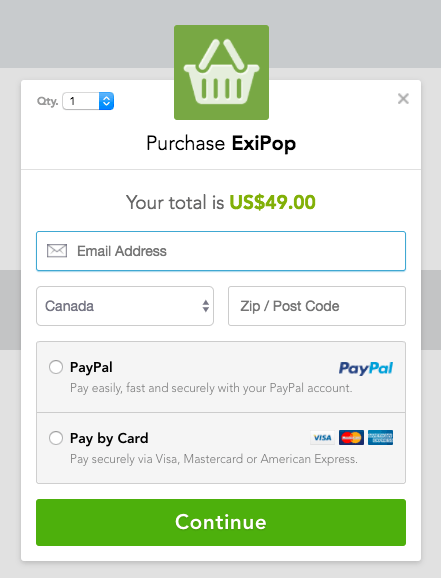
Example Paddle Checkout Popup
SendOwl
SendOwl will use your own Stripe and PayPal accounts, so you need to have those set up first. You won’t be charged a percentage fee on sales, only a monthly fee depending on things like how many products you want to list with them.
If you’re from a country that doesn’t support PayPal or Stripe, you’re out of luck. You’re also on the hook to make sure you configure and charge the appropriate taxes or you could be in for one hefty tax bill.
If you’re from Canada, from what I can see, even though SendOwl lets you charge sales tax based on their location, you might be on the hook for 15% tax on all sales. This is because CRA needs the full billing address and not just a postal code. Silly, I know.
Example SendOwl Checkout Popup
Creating the Plugin to Handle Webhooks
We need to create a plugin that will listen for the webhook notifications, and create a sale in Easy Digital Downloads when a purchase is made.
First, create a new folder edd-handle-webook and in it a new file edd-handle-webhook.php
We’ll use a base class for handling any webhook notification, then extend it for the service we want to use. Let’s add in the standard plugin header and start the class:
<?php
/*
Plugin Name: EDD Webhooks
Description: Captures new sale notifications from 3rd party service and adds to Easy Digital Downloads
Version: 1.0
Author: Brian Hogg
Author URI: https://brianhogg.com
Text Domain: edd-webhooks
License: GPL2
*/

abstract class EDD_Webhook_Handler {
	/**
	 * Functions to get the name of this webhook and an ID
	 */
	abstract function get_hook_name();
	abstract function get_hook_id();
}
The hook name is the friendly display name (ie. “SendOwl”) whereas the ID is for storing data like the SendOwl product ID (ie. “sendowl”).
Add a metabox to save the ecommerce service product/item ID
Next, we want to add a metabox to the EDD downloads to enter the unique ID from the quick checkout service. This way we know what EDD download a sale is for (if we have more than one).

With a couple functions we can show the metabox, and save the product/item ID value when the download is saved:
	function __construct() {
		add_action( 'add_meta_boxes', array( $this, 'add_item_id_metabox' ) );
		add_action( 'edd_metabox_fields_save', array( $this, 'save_item_id_metabox_fields' ) );
	}

	/**
	  * Functions to add a meta box so we can put in the product or item ID of the ecommerce service, and match it up to an EDD download
	  */

	function add_item_id_metabox() {
		if ( current_user_can( 'edit_product', get_the_ID() ) ) {
			add_meta_box( 'edd_' . $this->get_hook_id() . '_item', sprintf( __( '%s Integration', 'edd-webhooks' ), $this->get_hook_name() ), array( $this, 'render_item_id_metabox' ), 'download', 'side' );
		}
	}

	function render_item_id_metabox() {
		global $post;
		$item_id = get_post_meta( $post->ID, $this->get_hook_id() . '_item_id', true );
		?>
		<p><?php echo sprintf( esc_html__( 'Specify the %s product ID', $this->get_hook_id() . 'edd-webhooks' ), $this->get_hook_name() ); ?></p>
		<input type="text" name="<?= $this->get_hook_id() ?>_item_id" value="<?php esc_attr_e( $item_id ) ?>" />
		<?php
	}

	function save_item_id_metabox_fields( $fields ) {
		$fields[] = $this->get_hook_id() . '_item_id';
		return $fields;
	}
We’ll need a function later to grab the EDD Download by this item id:
	/**
	 * Get the EDD download ID for a given item id
	 *
	 * @param $item_id
	 * @return bool | EDD_Download
	 */
	function get_download_by_item_id( $item_id ) {
		if ( class_exists( 'EDD_Hide_Download' ) ) {
			remove_filter( 'edd_downloads_query', array( EDD_Hide_Download::get_instance(), 'shortcode_query' ) );
			remove_action( 'pre_get_posts', array( EDD_Hide_Download::get_instance(), 'pre_get_posts' ), 9999 );
		}
		$posts = get_posts( array(
				'post_type' => 'download',
				'post_status' => 'any',
				'suppress_filters' => true,
				'posts_per_page' => -1,
				'meta_key' => $this->get_hook_id() . '_item_id',
				'meta_value' => sanitize_text_field( $item_id )
			)
		);
		foreach ( $posts as $post ) {
			$download = new EDD_Download( $post->ID );
			return $download;
		}
		return false;
	}
Create the webhook endpoint
Now we want to create a function to listen for the webhook notification and process it. Thanks to the WP REST API now being part of core, this is easy to do:
/**
  * Function to register any checks (ie. required parameters) for the endpoint
  *
  * @return array
  */
function get_endpoint_args() {
	return array();
}

function register_endpoints() {
	register_rest_route(
		'edd-' . $this->get_hook_id() . '-webhook/v1',
		'/purchase_notification',
		array(
			'methods' => 'POST,PUT',
			'callback' => array( $this, 'handle_purchase_notification' ),
			'args' => $this->get_endpoint_args(),
		)
	);
}
and add a line to our constructor to register it in:
add_action( 'rest_api_init', array( $this, 'register_endpoints' ) );
For SendOwl, this will end up making https://yoursite.com/wp-json/edd-sendowl-webhook/v1/purchase-notification the webhook URL we’d put into the SendOwl account settings.
Handle the purchase notification
Last but not least, we want to implement the handle_purchase_notification function that will be called when a sale happens. This function will:
- Check that the notification actually came from the ecommerce provider, and isn’t fake
- Ensure the webhook request has all the data we need
- Create the customer in Easy Digital Downloads if it doesn’t exist already
- Create an Easy Digital Downloads payment record with all the details of the sale
	/**
	 * Handle a purchase notification
	 *
	 * @param WP_REST_Request $request
	 */
	function handle_purchase_notification( WP_REST_Request $request ) {
		$params = $this->get_webhook_params( $request );

		// Verify the required data is present
		if ( ! $this->verify_webhook_params( $params ) )
			return new WP_Error( 'invalid_alert', 'Invalid alert', array( 'status' => 404 ) );

		if ( ! $this->verify_request( $request ) ) {
			return new WP_Error( 'invalid_signature', 'Invalid signature', array( 'status' => 401 ) );
		}

		// Check and add the customer if needed
		$email = $this->get_buyer_email_address( $params );
		$customer = new EDD_Customer( $email, false );
		$first = $this->get_hook_name();
		$last = 'Customer';
		$user_id = 0;

		if ( ! $customer->id > 0 ) {
			$user = get_user_by( 'email', $email );
			if ( $user ) {
				$user_id = $user->ID;
				$email = $user->user_email;
			}

			$customer->create( array(
				'email' => $email,
				'name' => $first . ' ' . $last,
				'user_id' => $user_id
			) );
		} else {
			$email = $customer->email;
		}

		// See if there is a payment for the order ID already
		$payment = new EDD_Payment;
		foreach ( $customer->get_payments() as $customer_payment ) {
			if ( $customer_payment->transaction_id == $this->get_order_id( $params ) ) {
				$payment = $customer_payment;
				break;
			}
		}

		$payment->customer_id = $customer->id;
		$payment->user_id     = $user_id;
		$payment->first_name  = $first;
		$payment->last_name   = $last;
		$payment->email       = $email;

		// Make sure the user info data is set
		$payment->user_info = array(
			'first_name' => $first,
			'last_name'  => $last,
			'id'         => $user_id,
			'email'      => $email,
		);

		$download = $this->get_download_by_item_id( $this->get_item_id( $params ) );
		if ( ! $download )
			return new WP_Error( 'invalid_download', 'Invalid download', array( 'status' => 500 ) );

		// Only a single price for now
		$args = array(
			'quantity' => 1,
			'item_price' => edd_sanitize_amount( $this->get_item_price( $params ) ),
		);

		$args['tax'] = $this->get_item_tax( $params );

		// ensure download removed if already there
		$payment->remove_download( $download->ID, array( 'quantity' => 1 ) );
		$payment->add_download( $download->ID, $args );
		$payment->date = date( 'Y-m-d H:i:s', current_time( 'timestamp' ) );
		$payment->status = 'pending';
		$payment->currency = $this->get_order_currency( $params );
		$payment->gateway = $this->get_hook_id();
		$payment->mode = 'live';
		$payment->transaction_id = $this->get_order_id( $params );

		$payment->save();

		// Now switch the status from pending to complete to trigger various actions, like generating a license key
		$payment->status = 'complete';
		$payment->save();

		return new WP_REST_Response( array( 'success' => true ) );
	}
This uses a bunch of abstract functions like get_order_id, get_item_price and get_buyer_email_address which will be different depending on the webhook we’re listening to. We’ll implement those for SendOwl and Paddle in a minute.
You might notice that we’re saving the payment as pending first, then setting the status to complete before saving it again. The reason is if we don’t, things like license key generation won’t fire properly in Easy Digital Downloads.
Entire base class
The entire code for the base class is in this gist, and we’ll extend this for the webhook we want to listen to.
Add in Easy Digital Downloads Software Licensing to the plugin
You can now add software licensing to your plugin, so future updates will be served from Easy Digital Downloads. Upload the zip of your plugin with software licensing included into Paddle/SendOwl and you won’t have to keep it updated there unless something breaks with your plugin and a future version of WordPress.
My Making Pro Plugins course can help get this all setup quickly, and give you a way to keep your premium and free versions of your plugin up to date easily.
Using SendOwl
SendOwl has webhooks for just about everything, including purchase notifications.
Create your plugin as a product
Add a digital file product in SendOwl for your plugin. You just need to set the name and price, Easy Digital Downloads will handle the licensing.
Upload the zip file of your plugin to the SendOwl product.
Creating the SendOwl webhook handler class
First we want to set the display name and an ID for saving the product/item ID metadata, and defining our webhook URL:
class EDD_Sendowl_Webhook_Handler extends EDD_Webhook_Handler {
	function get_hook_id() {
		return 'sendowl';
	}

	function get_hook_name() {
		return 'SendOwl';
	}

	// ...
}
As noted in their documentation they don’t send the proper headers so things like the WP REST API can parse the JSON data for you. It just means grabbing the raw data and parsing it with:
	function get_webhook_params( $request ) {
		// Need to get raw parameters with the SendOwl webhooks
		return json_decode( file_get_contents( "php://input" ), true );
	}
The verification is done by looking at the headers sent in the request, and encoding it with your secret key (click the ‘reveal’ link):
	function get_secret_key() {
		// TODO: Move this to your server environment if possible vs. in code
		return '.......';
	}

	/**
	 * Verifies the header is correct
	 * See https://help.sendowl.com/help/using-web-hooks#authenticating-web-hooks
	 * and Shopify example https://ecommerce.shopify.com/c/shopify-apis-and-technology/t/validating-webhook-using-hmac-in-php-281376
	 */
	function verify_request( $request ) {
		if ( isset( $_SERVER['HTTP_X_SENDOWL_HMAC_SHA256'] ) ) {
			$hmac_header = $_SERVER['HTTP_X_SENDOWL_HMAC_SHA256'];
			$data = file_get_contents( 'php://input' );
			$calculated_hmac = base64_encode( hash_hmac( 'sha256', $data, $this->get_secret_key(), true ) );
			return ( $hmac_header == $calculated_hmac );
		} else {
			// Log the error if you wish by uncommenting this line
			// error_log( 'Request not from sendowl: ' . print_r( $_SERVER, true ) . print_r( $data, true ) );
		}
		return false;
	}
The rest is fetching the purchased product/item ID, sale price, buyer email address and other details from the webhook data. Here’s the entire EDD_SendOwl_Handler classer class and a line to create an instance of that class, which you can paste after the base class:
Note that this implementation is assuming you’re not using the cart feature (ie. letting customers purchase more than one plugin at a time).
Turning on the SendOwl webhook
Once you’ve saved and activated the EDD webhook plugin, go to the webhook settings in SendOwl and click Add New Webhook. Enter the URL as https://yoursite.com/wp-json/edd-sendowl-webhook/v1/purchase-notification and select “Order completed” as the Event.
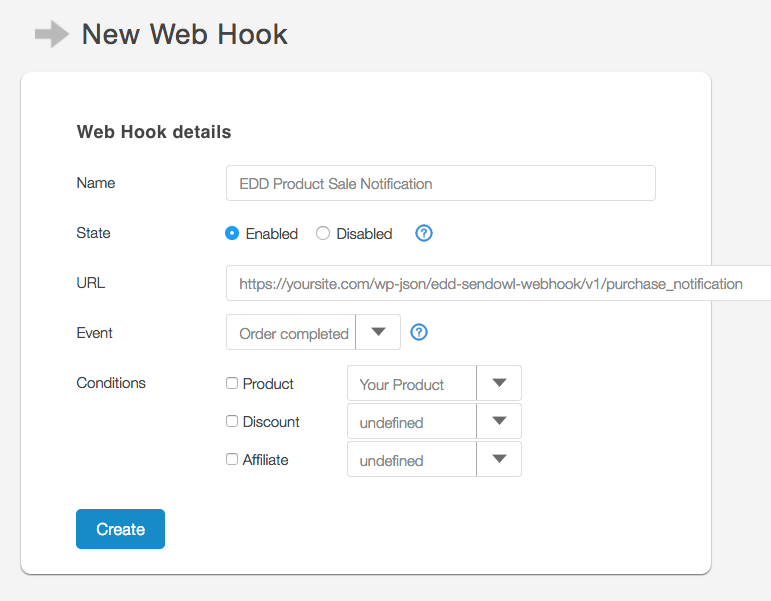
Click Create to save the new webhook.
Add the SendOwl product ID to your EDD download
Edit the download in EDD for your plugin, and enter the SendOwl product ID in the metabox. You can find it by going to Product on the left, click on your product, and grab the ID from the URL. For example:
https://www.sendowl.com/products/622259/edit
the ID would be 622259. Save your EDD download with this ID.
Testing
You can test by using the greyed out and tough to see ‘Test Web Hook’ link on the edit webhook screen:
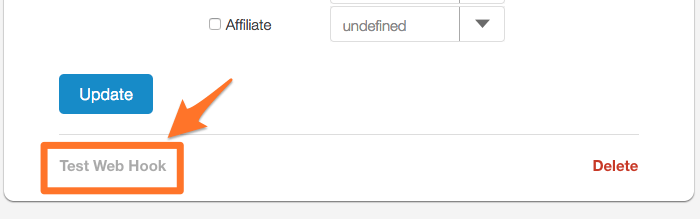
The test will create a new sale from “mrbuyer@fake.com” which you can delete in EDD afterwards.
You can also run some test transactions by entering your test Stripe credentials into SendOwl instead of your live ones. Then, use a test credit card when you make the purchase on your site. You’ll need to contact SendOwl support in order to clean up and delete these test transactions from your account.
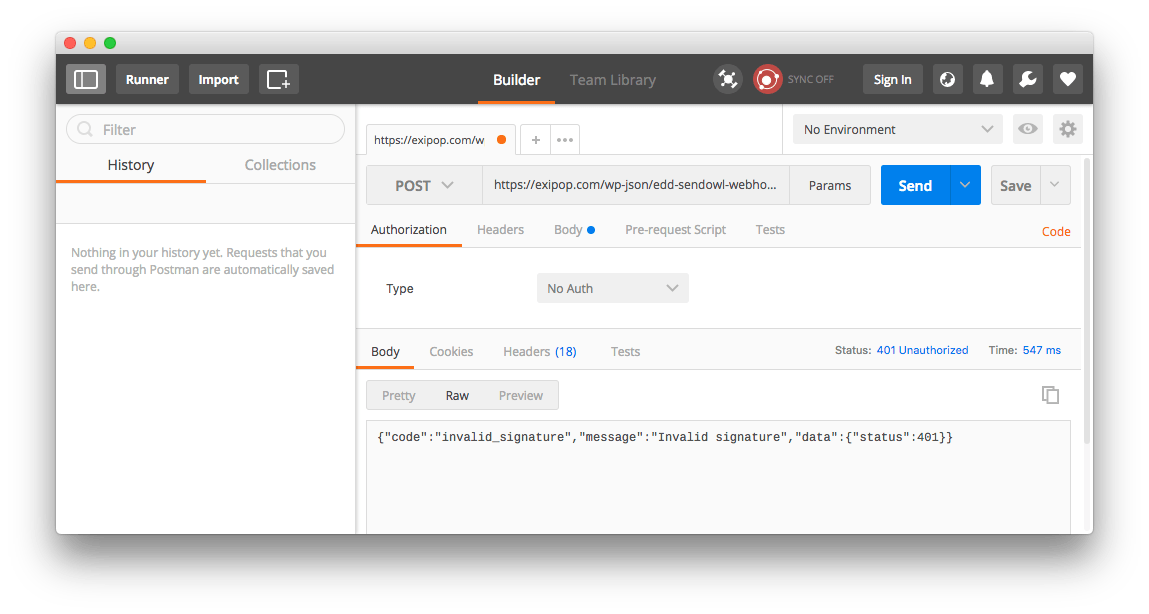
Lastly you can make sure that someone trying to fake a sale will be rejected by sending a blank request with something like Postman:
Voila – now you can add the “buy now” button from SendOwl and your customers (and hopefully your conversion ratio) can enjoy the streamlined checkout experience!
Using Paddle
Paddle also has a bunch of webhooks we can use to get notified of things like new purchases.
Create your plugin as a product
Add a new product in Paddle as a software/app product, and upload the zip file of your plugin to that product.
Creating the Paddle webhook handler class
First we want to set our hook name and ID in a new Paddle handler class:
class EDD_Paddle_Webhook_Handler extends EDD_Webhook_Handler {
	function get_hook_id() {
		return 'paddle';
	}

	function get_hook_name() {
		return 'Paddle';
	}

	// ...
}
We then need to add in the public key from our account, which we’ll use to verify any requests are actually coming from Paddle:
	function get_public_key() {
		// TODO: Move this to server environment vs. in code
		return '-----BEGIN PUBLIC KEY-----
MIICIjANBgkqhkiG9w0BAQEFAAOCAg8AMIICCgKCAgEA125r975+OmZ67/b0T0fN
...
ECgBp9p2k2vv9gGqsfBXJHUCAwEAAQ==
-----END PUBLIC KEY-----';
	}
Make sure there’s no spacing in each line of your public key, as it won’t work there is.
Now we can verify a request is real using the p_signature parameter in the request:
	function verify_request( $request ) {
		  // Get the p_signature parameter & base64 decode it.
		  $signature = base64_decode( $request->get_param( 'p_signature' ) );

		  // Get the fields sent in the request, and remove the p_signature parameter
		  $fields = $request->get_params();
		  unset( $fields['p_signature'] );

		  // ksort() and serialize the fields
		  ksort( $fields );
		  foreach ( $fields as $k => $v ) {
			  if ( ! in_array( gettype( $v ), array( 'object', 'array' ) ) ) {
				  $fields[$k] = "$v";
			  }
		  }
		  $data = serialize( $fields );

		  // Veirfy the signature
		  $verification = openssl_verify( $data, $signature, $this->get_public_key(), OPENSSL_ALGO_SHA1 );
		  if ( $verification == 1 ) {
			  return true;
		  }

		return false;
	}
The rest is fetching the purchased product/item ID, sale price, buyer email address and other details from the webhook data. Here’s the entire EDD_Paddle_Handler classer class and a line to create an instance of that class, which you can paste after the base class:
Add the Paddle product ID to your EDD download
Edit the download in EDD for your plugin, and enter the Paddle product ID in the metabox. You can find it by going to Checkout > Products on the left, click on your product, and grab the ID from the URL. For example:
https://vendors.paddle.com/release/517010
the ID would be 517010. Save your EDD download with this ID.
Turning on the Paddle webhook
After you’ve saved and activated the plugin with the base and Paddle classes, go to your vendor settings and click Alerts. Enable the webhook notification for “Payment Success” by checking the box:
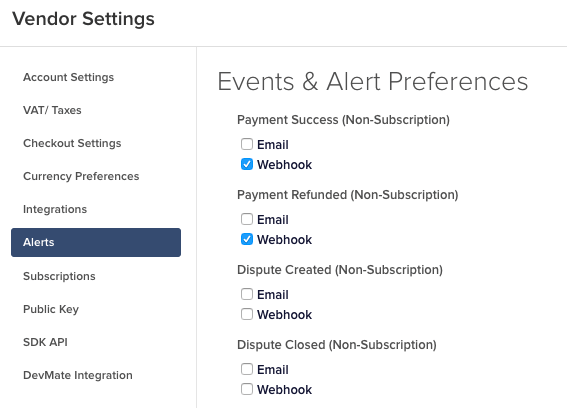
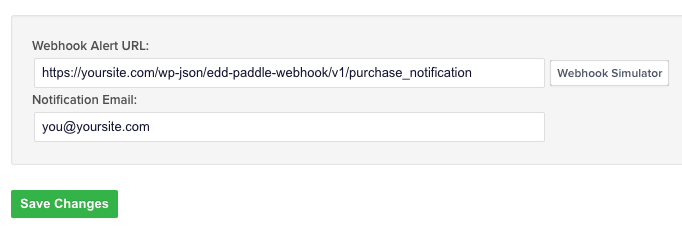
Then scroll down to the bottom and put https://yoursite.com/wp-json/edd-paddle-webhook/v1/purchase_notification as the webhook alert URL:
Testing
While in the Alert settings, click the “Webhook Simulator” button. Here you can send a test request and see the response.
Voila – now you can add the “buy now” button from Paddle to your site and your customers (and hopefully your conversion ratio) can enjoy the streamlined checkout experience!
Next Steps
Change the purchase receipt email
Because we’re using a quick checkout service, this will save the order as being from “Webhook Customer” rather than their real name. So you should remove any references to {fullname} or {name} in the template under Downloads > Settings > Emails > Purchase Receipts.
While there, also remove the {download_list} since the ecommerce platform will be serving the initial version of the file.
Handle refunds and any other conditions
Right now only purchase notifications are handled. If you’ll be offering refunds and there’s a refund webhook available, you can add another endpoint and code to revoke their license keys and mark the purchase as refunded in EDD.
Use Freemius instead?
All of this integration work could be avoided if you use Freemius instead, as they already have a quick checkout mechanism for both in-plugin and web sales. My Making Pro Plugins course also covers setting up Freemius along with a system to make it easy to maintain your plugin over time.